Wall Art Above Bed: Ideas That Transform Your Space
Founder & Lead Interior Stylist at DIY Interior Decorating · NCIDQ Certified, ASID Professional Member · 14+ years in residential interior styling, DIY furniture upcycling, and spatial color harmony
Hanging wall art above bed sounds simple until you're standing there with a nail and a tape measure, second-guessing everything. Get the height wrong and it looks like it's floating. Get the size wrong and a king bed swallows it whole.
The good news? There's a small set of rules that actually work, and they're built on real standards rather than guesswork. Interior designers typically center art so the midpoint sits around 57 to 60 inches from the floor, the same eye-level standard museums use for gallery hangs.
Below, we'll walk through placement, sizing, mock-up, and hardware so your first hole is the right one.
wall art above bed
Hang wall art above bed so its center sits 57 to 60 inches off the floor. Keep a 6 to 10 inch gap above the headboard. Aim for art that's about two-thirds to three-quarters of your bed's width.
Center on the bed, not the wall. Hang it before or alongside your headboard install.
Why Placement Beats the Art Itself
Placement decides whether a piece reads as intentional or accidental. Our research into standard hanging practice shows one rule carries more weight than style, color, or frame choice: the art has to relate to the bed, not float on its own.
The eye-level rule that actually matters
A 57 to 60 inch center point is the baseline used in gallery and museum hangs. In a bedroom, that number shifts. You're viewing the art from a seated or lying position, not standing, so the visual midpoint moves lower.
Aim for the art's center to land roughly 57 to 60 inches from the floor in a standard 8 foot room. In a room with higher ceilings, that can go up a touch. In a low-ceiling room, drop it slightly.
Why "centered on the bed" and "centered on the wall" aren't the same thing
Centering on the wall only works when the bed is dead center. Most aren't. A nightstand on one side, a door frame on the other, and suddenly the wall's midpoint sits feet away from the bed's centerline.
Always measure from the bed's centerline, not the wall. If the bed is off-center, the art follows the bed. A piece that hovers over empty wall space looks like a mistake, even when the frame and print are perfect.

Image source: Bing (Web (fair-use with source credit))
Sizing Your Art to Your Bed (The Only Rule That Really Matters)
Sizing is where most above-bed hangs fall apart. A single small print over a California king looks stranded. A canvas wider than the bed throws the whole wall off balance.
The math is simple once you know the ratio.
Bed width to art width: the ⅔ to ¾ sweet spot
Measure your bed's width. Multiply by 0.66 and by 0.75. The art you choose should fall somewhere between those two numbers.
That's the range designers use to keep proportion looking right.
For a queen, that means roughly 40 to 45 inches of art width. For a king, it's closer to 50 to 57 inches. Twin beds sit in the 25 to 29 inch range.
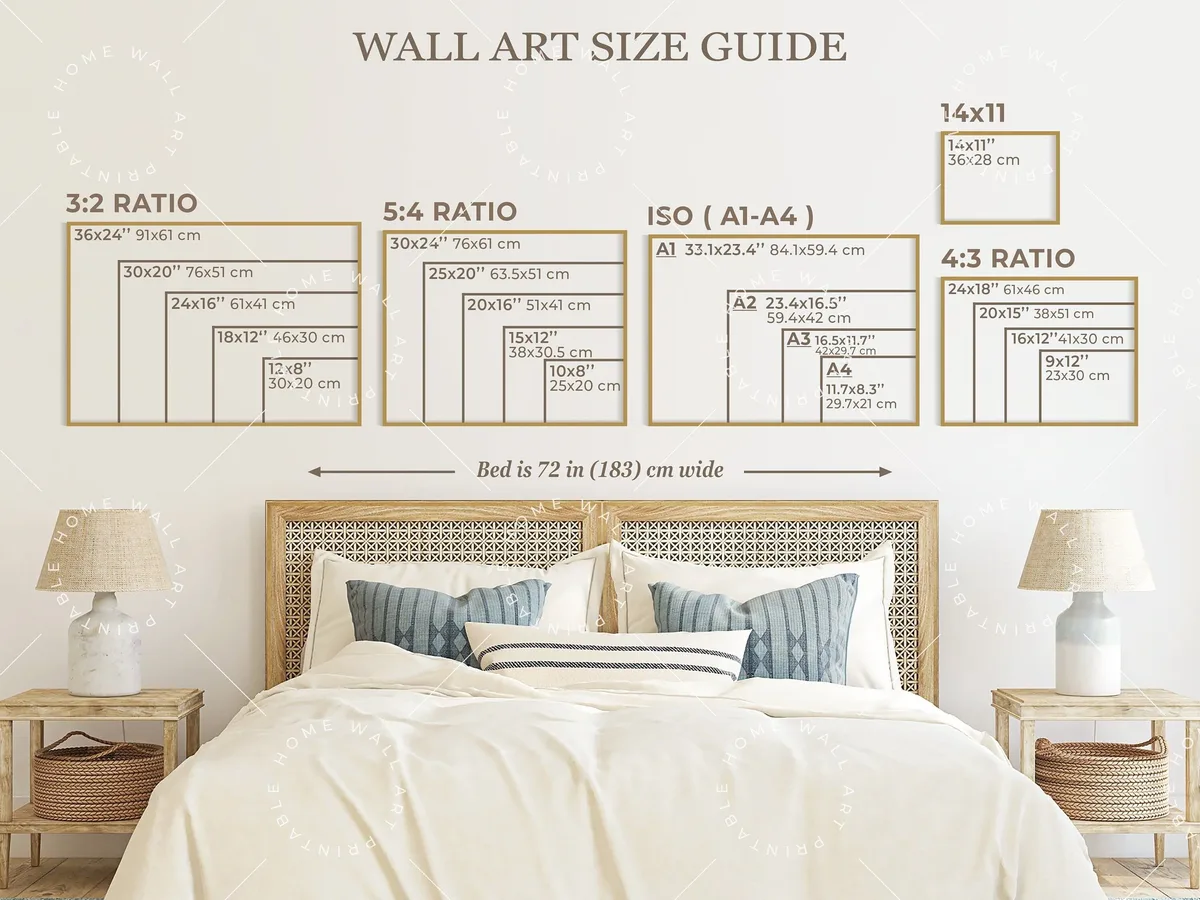
Image source: Bing (Web (fair-use with source credit))
Queen, king, twin: what each bed actually needs
Here's the quick reference, based on standard mattress widths:
| Bed Size | Mattress Width | Target Art Width |
|---|---|---|
| Twin | 38 in | 25–29 in |
| Full | 54 in | 36–40 in |
| Queen | 60 in | 40–45 in |
| King | 76 in | 50–57 in |
| California King | 72 in | 48–54 in |
One big piece vs. diptych vs. gallery wall
One oversized canvas is the easiest read. It fills the space with zero layout fuss and looks clean from any viewing angle.
A diptych or triptych (two or three panels) splits the same total width across frames. Gallery walls work best with small prints and a wall that's wider than the bed, since they need breathing room on both sides.
If the bed sits tight against a corner, skip the gallery wall. It'll feel crowded.
Height, Gap, and the Headboard Problem
The gap between your headboard and the art's bottom edge is the single most common mistake we see in aggregate decor reviews. Too little and it looks jammed. Too much and the piece drifts toward the ceiling.
The 6 to 10 inch gap above the headboard
Shoot for a 6 to 10 inch gap. Under 6 inches looks pinched, especially with a thick frame or wide mat. Over 10 inches starts to detach the art from the bed visually.
Taller headboards need the gap measured from the top of the headboard, not the mattress. That's the mistake most people make.
Low ceiling vs. vaulted ceiling adjustments
Low ceiling (8 feet or under): keep the gap at the low end, 6 to 7 inches. Cap the art's top edge at least 12 inches below the ceiling.
Vaulted or high ceiling: you have room, but don't go wild. Bump the gap up to 8 to 10 inches and let the art drift slightly higher. The goal is to keep the art visually tied to the bed, not the ceiling peak.
What to do with a tall headboard or no headboard at all
Tall headboard (over 60 inches): skip a large piece entirely. A single narrow landscape or a pair of small squares reads better than one oversized canvas fighting for space above the headboard.
No headboard: your 6 to 10 inch measurement comes from the top of the mattress, plus a standard pillow height. Aim for art's bottom edge to sit 20 to 30 inches above the mattress. That's where it'll look balanced without a headboard as a visual anchor.
Visual Mock-Up: How to Test It Before You Drill
Every hole you put in the wall is permanent, or at least patchable with cost. Mocking up the layout first is the cheapest five minutes of the whole project, and it's the step most people skip.
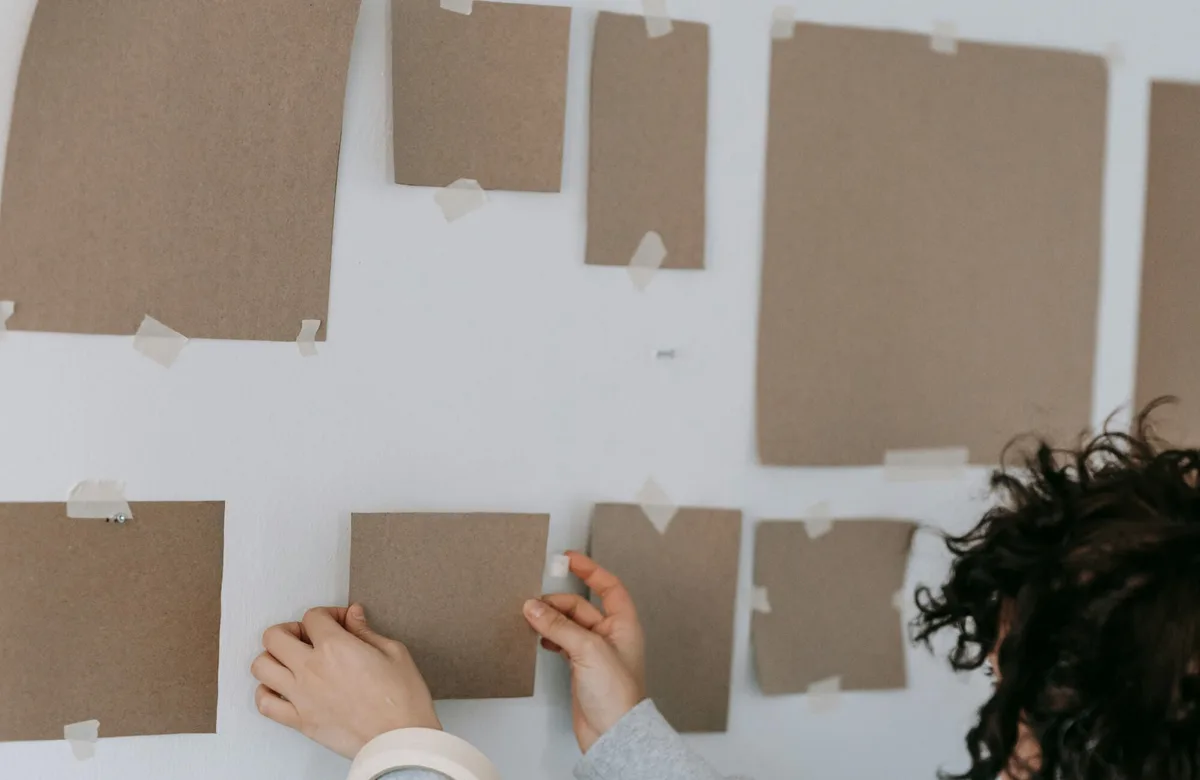
Image source: Bing (Web (fair-use with source credit))
The kraft paper and painter's tape method
Trace each frame onto kraft paper or cardboard. Cut it out. Tape the templates to the wall where you think the art should go.
Then step back and live with it for a day.
This method lets you test single-piece, diptych, and gallery layouts without commitment. Move templates around until the arrangement feels right from the doorway, from the bed, and from the bathroom mirror.
Marking the centerline
Once the layout is locked, mark the bed's centerline on the wall with a strip of painter's tape. Every template should mirror across that line.
If you're using a single piece, the piece's center sits on the line. If you're using multiple frames, the whole set's midpoint sits on the line. Symmetry is what sells the arrangement.
Checking glare from windows and lamps
Before you commit, turn on every bedside lamp and open the curtains. Stand where your pillow sits and look up.
Glass frames catch glare badly. If the angle is bad, swap to a matte canvas or acrylic glazing. You want to see the art, not a reflection of your lamp bulb.
Hanging Hardware by Wall Type and Art Weight
Wrong hardware is how art ends up on the floor at 3 AM. The anchor you need depends on two things: what your wall is made of, and how much the framed piece weighs.
| Wall Type | Best Hardware | Weight Limit |
|---|---|---|
| Drywall with stud | Screw into stud | 50+ lbs |
| Drywall, no stud | Toggle bolt or heavy anchor | 50–100 lbs |
| Plaster | Toggle bolt | 30–50 lbs |
| Brick / concrete | Masonry anchor | 50+ lbs |
| Rental, light art | Adhesive strips (paired) | 4–16 lbs |
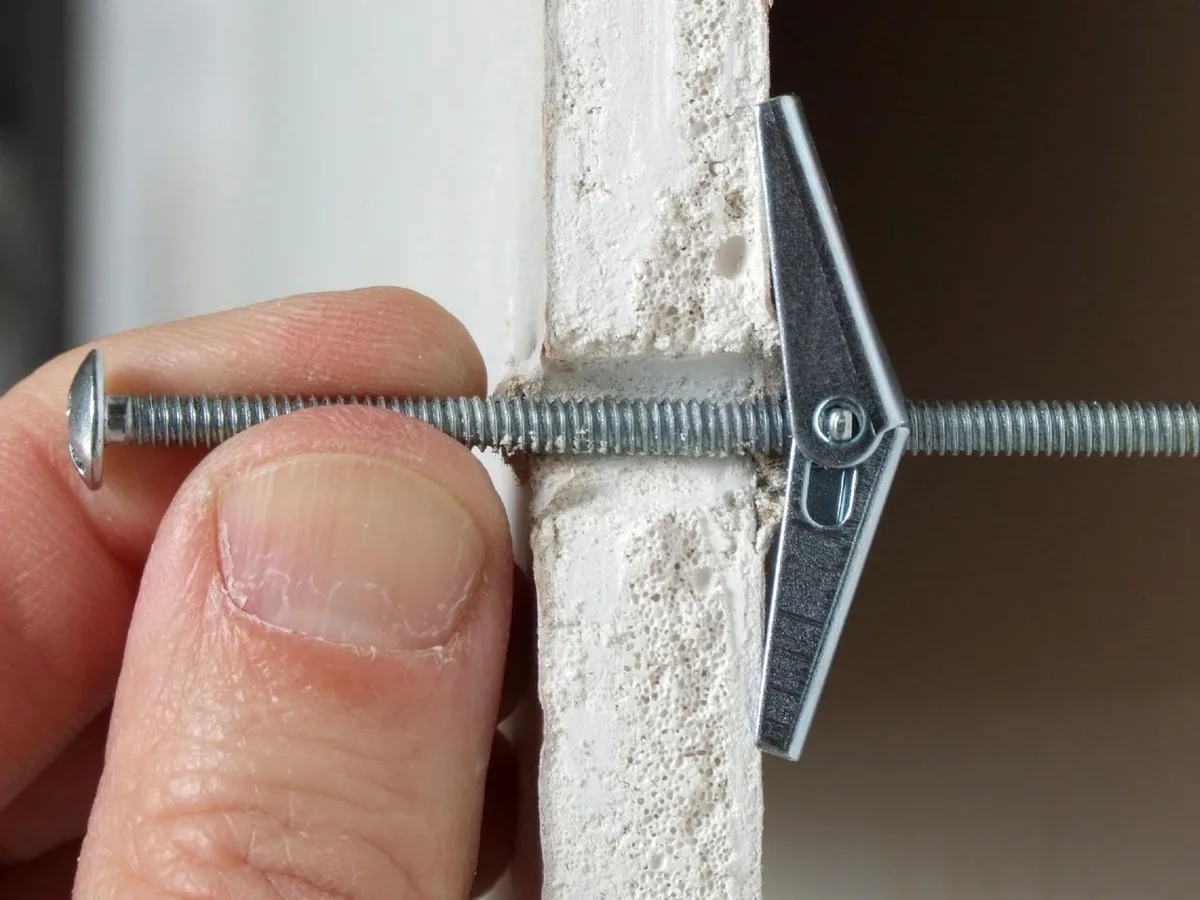
Image source: Bing (Web (fair-use with source credit))
What to use when you can't find a stud
Toggle bolts are the go-to when there's no stud behind the spot you need. They spread load behind the drywall instead of in front of it. Manufacturer specs indicate a single 3/16 inch toggle bolt can hold 50 to 100 pounds depending on drywall thickness.
For heavier pieces, use two toggles spaced wide across the frame's back rail instead of one central anchor.
Rental-safe options that actually hold weight
The 3M Command picture hanging strips are the standard rental option, but they have real limits. Aggregate buyer reviews report they hold small frames well and fail quickly above 10 to 16 pounds, especially in humid rooms.
If your art is over 16 pounds and you're renting, you have two choices: use a damage-free picture ledge that sits on the wall with adhesive plus a screw into a stud (which is technically a small hole), or accept a patch-and-paint job at move-out. Rental deposits typically get charged per hole in most US leases, so check your lease before drilling.
Layouts That Work (And the Ones That Don't)
The layout you pick depends entirely on your bed's width and the wall's usable space. Here's how each common arrangement actually plays out.
Single statement piece
One large canvas or framed print is the safest layout for most bedrooms. It reads as one clean visual block and needs zero spacing math. Works for: narrow walls, beds in corners, and anyone who doesn't want to fuss with a gallery grid.
Diptych and triptych
A diptych (two panels) or triptych (three panels) splits the same total width you'd use for a single piece. If your target is 45 inches, a triptych uses three 15-inch-wide panels spaced 2 to 3 inches apart.
This layout works when the bed is centered on a wall with breathing room on both sides. It fails in corners, where the outside panels get visually crowded.
Gallery wall above the bed
A gallery wall needs a wall noticeably wider than the bed. Shoot for at least 12 inches of clear wall on each side of the mattress. Smaller than that and the arrangement feels wedged against door frames or nightstands.
The most reliable gallery grid above a bed is a 3-by-2 arrangement (six frames) using 8×10 to 11×14 prints. Keep spacing between frames at 2 to 4 inches.
Asymmetric layouts for awkward walls
If the bed sits off-center or a window interrupts the wall, symmetry is off the table. An asymmetric layout (a large anchor piece plus one or two smaller offset frames) handles this better than forcing a centered grid.
Mistakes That Make Above-Bed Art Look Wrong
Most above-bed art problems trace back to five repeat offenders. Fix these and the arrangement almost always reads well.
- Hanging too high. Art that drifts above the 10 inch mark looks detached from the bed. Pull it down before you reach for a second nail.
- Art too small for a king. A single 16×20 print over a 76 inch bed looks lost. Scale up or add panels.
- Centering on the wall instead of the bed. If the bed is off-center, the art must follow the bed, not the wall's midpoint.
- Glass frames catching every lamp. Bedside lamps bounce light off glass at the exact angle you view from. Matte canvas or acrylic glazing solves this.
- Ignoring the lying-down view. Art that looks great standing up often feels too high from your pillow. Lie on the bed and look up before finalizing.
Cost, Weight, and Sizing Numbers Worth Knowing
Frame size, weight, and cost all scale together. Here's what to expect as of 2026, based on standard framing and print pricing.
| Frame Size | Typical Weight | Canvas Print Price | Framed Print Price |
|---|---|---|---|
| 16×20 in | 3–6 lbs | $40–$90 | $70–$160 |
| 24×36 in | 8–15 lbs | $90–$200 | $150–$350 |
| 30×40 in | 15–25 lbs | $140–$320 | $250–$550 |
| 40×60 in | 25–40 lbs | $250–$500 | $400–$900 |
Anything over 15 pounds is where hardware choice stops being optional. Adhesive strips max out long before that. Toggle bolts and stud screws are the safe route once you cross 10 pounds.
A diptych or triptych usually costs more than a single canvas of the same total width. You're paying for extra frames, extra mats, and extra hardware per panel.
Rental-Proof and Earthquake-Safe Hanging
Two situations change the whole approach: renting, and living somewhere the ground moves.
For rentals, the priority is keeping your deposit. Adhesive strips handle pieces up to roughly 10 to 16 pounds in ideal conditions. Higher humidity, textured walls, and cold rooms all reduce that limit.
For earthquake zones like California, Japan, and parts of the Pacific Northwest, heavy art above a bed is a real safety concern. The USGS tracks seismic hazard across the country, and if you're in a high-risk area, standard picture wire isn't enough.
What actually works in quake zones:
- Use two anchor points per frame, not one central hook
- Add museum putty or clear adhesive at the bottom corners of the frame
- Skip glass frames over the bed entirely, use acrylic or canvas
- Avoid hanging anything over 20 pounds directly above where you sleep
The same logic applies to kids' rooms. Anchor everything into studs. Skip long picture wire.
Secure any frame edges that could swing.
Maintenance and Long-Term Care
Once the art's up, the work isn't quite done. A few habits keep it looking right for years.
- Check hardware every six months. Screws loosen. Anchors can pull. A quick twist test catches problems early.
- Dust frames monthly. A dry microfiber cloth beats sprays, which can streak glass and damage mats.
- Keep art out of direct sunlight. UV exposure fades prints fast. Rotate pieces or add UV-filtering glazing if the wall gets sun.
- Watch for humidity swings. Paper and canvas warp in damp rooms. Dehumidifiers in basements and coastal homes help.
- Recheck the gap after bedding changes. A thicker duvet or new pillows can shift the visual relationship between bed and art.
If you ever re-hang, patch old holes with lightweight spackle, let it dry, sand smooth, and touch up with matching paint. Landlord-friendly.
Frequently Asked Questions
How high should wall art be above a bed?
Center the art 57 to 60 inches from the floor. Leave a 6 to 10 inch gap between the top of the headboard and the bottom of the frame. Taller headboards push the art up.
Low ceilings pull it down.
How wide should art be above a king bed?
Aim for 50 to 57 inches of total art width. That's two-thirds to three-quarters of a 76 inch king mattress. A single oversized canvas, a diptych, or a triptych all work at that scale.
Can I hang art above a bed without nails?
Yes, for light pieces. Adhesive strips hold 4 to 16 pounds per pair in ideal conditions. Anything heavier needs a screw into a stud or a toggle bolt.
Damage-free picture ledges work too, though they involve a small screw.
Should art above a bed be centered on the bed or the wall?
Center it on the bed, always. Most beds aren't dead-center on their wall, and the art needs to relate to the bed's centerline. Wall-centered art only looks right when the bed is perfectly centered, which is rare.
How many pictures should go above a bed?
One large piece is the safest choice for most bedrooms. Two or three panels work well on a wider wall. A full gallery wall needs at least 12 inches of clear wall on each side of the bed to avoid feeling cramped.
What if there's no headboard?
Measure from the top of the mattress plus pillow height. Aim for the bottom edge of the art to sit 20 to 30 inches above the mattress. That gap substitutes for the missing headboard as a visual anchor.
Final Recommendation: The Layout That Works for Most Bedrooms
For the vast majority of bedrooms, one oversized piece centered on the bed wins. It's the easiest to hang, the easiest to get right, and the most forgiving when the wall isn't perfectly proportioned.
Run the numbers in this order:
- Measure bed width. Multiply by 0.66 and 0.75. That's your target art width.
- Measure headboard height. Add 6 to 10 inches. That's where the frame's bottom edge sits.
- Mark the bed's centerline with painter's tape, not the wall's centerline.
- Mock up the layout with kraft paper before drilling anything.
- Match hardware to weight: adhesive strips under 10 pounds, toggle bolts over.
If the wall is wide, add a diptych or triptych for visual balance. If it's narrow or cornered, stick with one piece. If you rent, keep weight under 16 pounds or accept a small patch job later.
Get those five steps right and the art reads as intentional. Skip one and it'll always look slightly off.

Similar Posts